Immich on Azure: From Drive Failure to Cloud Resilience
Overview
A physical drive failure on my homelab NAS put my locally-hosted Immich photo library at risk. Rather than rebuild in place, I migrated the workload to an Azure VM, using the opportunity to apply proper network security, TLS, and backup practices that the original local setup didn't have. This project covers the full build: VM provisioning, Docker deployment, reverse proxy and TLS, network security, DNS, and backup strategy — along with the reasoning behind each architectural decision, including where I deliberately avoided more expensive Azure PaaS services in favor of leaner alternatives better suited to a single-VM, personal-scale workload.
Public URL: https://immich.niklabs.org
The Problem
My local Immich instance ran on a QNAP NAS volume with no offsite copy and no automated backup policy — a single point of failure I hadn't yet addressed. When a drive failure in that array put the library at risk, it confirmed the gap and set the priority: rather than restore the same architecture locally, I re-platformed onto Azure with backup and network security built in from the start, rather than retrofitted after the fact.
Architecture
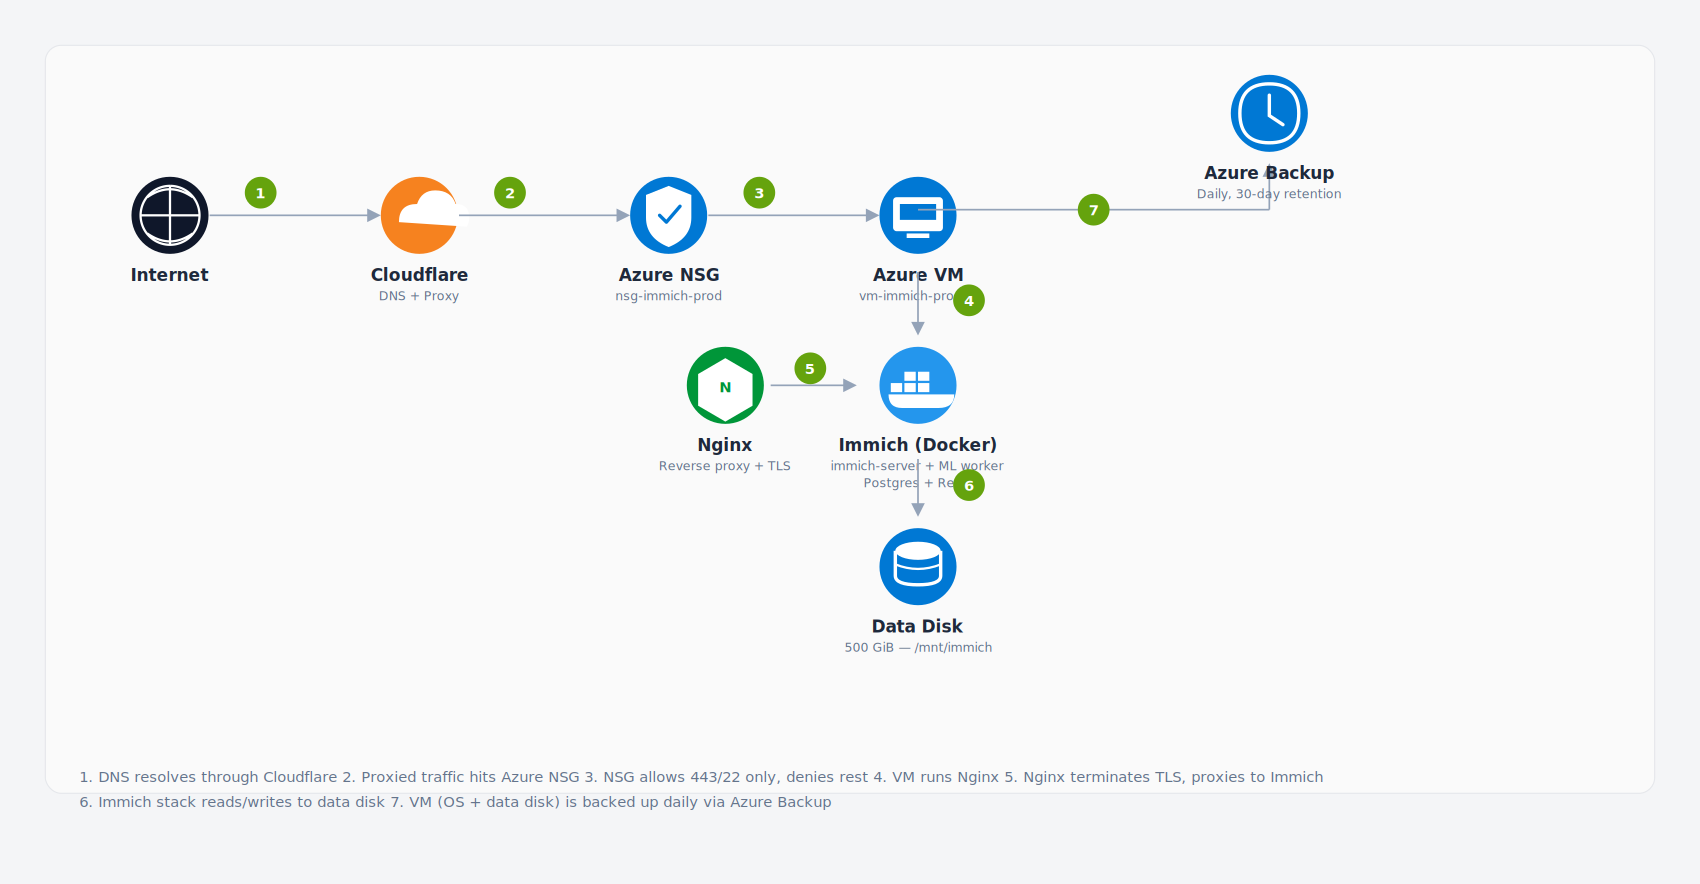
Environment Details
Resource Inventory
| Resource | Name | Value |
|---|---|---|
| Resource Group | rg-immich-prod |
Canada Central |
| Virtual Network | vnet-immich-prod |
10.20.0.0/16 |
| Subnet | snet-immich-app |
10.20.1.0/24 |
| VM | vm-immich-prod01 |
Standard_B2s (2 vCPU / 4 GiB) |
| VM Public IP | pip-immich-prod01 |
20.116.42.187 (Static, Standard SKU) |
| VM Private IP | — | 10.20.1.4 |
| NIC | nic-immich-prod01 |
— |
| OS Disk | (VM-managed) | Standard SSD LRS, 128 GiB |
| Data Disk | disk-immich-data |
Standard SSD LRS, 500 GiB |
| NSG | nsg-immich-prod |
attached to snet-immich-app |
| Recovery Services Vault | rsv-immich-prod |
Daily backup policy |
| Admin home IP | — | 203.0.113.45 (redacted for documentation) |
DNS Record (Cloudflare)
| Type | Name | Value | Proxy status |
|---|---|---|---|
| A | immich.niklabs.org |
20.116.42.187 |
Proxied (orange cloud) |
Because the record is proxied, public DNS resolution returns a Cloudflare anycast IP, not the VM's real address — the VM's public IP is only reachable directly by clients that already know it, which the NSG rules further restrict to Cloudflare's published ranges.
Network Security Group Rules
The NSG is the primary network control point. Rules are scoped as tightly as practical: HTTPS only from Cloudflare's edge, SSH only from my own known IP, everything else denied.
| Priority | Name | Direction | Port | Protocol | Source | Action |
|---|---|---|---|---|---|---|
| 100 | Allow-HTTPS-Cloudflare |
Inbound | 443 | TCP | Cloudflare IP ranges* | Allow |
| 120 | Allow-SSH-Admin |
Inbound | 22 | TCP | 203.0.113.45/32 |
Allow |
| 4096 | Deny-All-Inbound |
Inbound | Any | Any | 0.0.0.0/0 |
Deny |
* Cloudflare publishes its IPv4/IPv6 ranges at cloudflare.com/ips. I keep these current with a scheduled refresh rather than a one-time hardcoded list — see Future Improvements.
Azure CLI — creating the NSG rules
# Allow HTTPS from Cloudflare ranges
az network nsg rule create \
  --resource-group rg-immich-prod \
  --nsg-name nsg-immich-prod \
  --name Allow-HTTPS-Cloudflare \
  --priority 100 \
  --direction Inbound \
  --access Allow \
  --protocol Tcp \
  --destination-port-ranges 443 \
  --source-address-prefixes 173.245.48.0/20 103.21.244.0/22 103.22.200.0/22 \
    103.31.4.0/22 141.101.64.0/18 108.162.192.0/18 190.93.240.0/20 \
    188.114.96.0/20 197.234.240.0/22 198.41.128.0/17 162.158.0.0/15 \
    104.16.0.0/13 104.24.0.0/14 172.64.0.0/13 131.0.72.0/22

# Allow SSH only from my admin IP
az network nsg rule create \
  --resource-group rg-immich-prod \
  --nsg-name nsg-immich-prod \
  --name Allow-SSH-Admin \
  --priority 120 \
  --direction Inbound \
  --access Allow \
  --protocol Tcp \
  --destination-port-ranges 22 \
  --source-address-prefixes 203.0.113.45/32

# Explicit deny-all catch-all (Azure includes an implicit deny at 65500;
# this makes intent explicit and auditable)
az network nsg rule create \
  --resource-group rg-immich-prod \
  --nsg-name nsg-immich-prod \
  --name Deny-All-Inbound \
  --priority 4096 \
  --direction Inbound \
  --access Deny \
  --protocol '*' \
  --destination-port-ranges '*' \
  --source-address-prefixes '*'
UFW mirrors the NSG (defense-in-depth)
sudo ufw default deny incoming
sudo ufw default allow outgoing
sudo ufw allow from 203.0.113.45 to any port 22 proto tcp
sudo ufw allow 443/tcp
sudo ufw enable
I run this restriction at both the Azure network layer (NSG) and the host layer (UFW), so a misconfiguration in one layer doesn't fully expose the VM — a deliberate defense-in-depth choice rather than relying on a single control point.
Architectural Decisions and Trade-offs
A deliberate goal of this project was to make cost-justified architecture choices rather than defaulting to the most feature-rich Azure service for each layer. Two decisions are worth calling out explicitly, since I considered and rejected both:
Why not Azure Application Gateway?
Application Gateway (or Azure Front Door) is the "default enterprise" choice for TLS termination and routing. I rejected it here because:
- Single backend, single application — App Gateway's core value (path-based routing across multiple backend pools, WAF, autoscaling) has no use case when there's exactly one VM serving exactly one app
- Cost — Standard_v2 App Gateway runs roughly $125–250+ CAD/month in compute + capacity unit charges alone, before any WAF add-on — multiples of the entire rest of this stack combined
- Nginx with a Cloudflare Origin CA certificate achieves the same TLS termination and reverse-proxy result for this workload at $0 additional cost
Where App Gateway would be the right call: multiple backend services behind one hostname, a requirement for a managed WAF ruleset, or global/multi-region routing — none of which apply to a single personal-scale VM.
Why not Azure Firewall?
I considered Azure Firewall as a way to avoid exposing the VM's public IP directly to the internet, and rejected it because:
- Azure Firewall costs roughly $0.395 CAD/hour for the instance alone (~$285+ CAD/month), plus data processing charges — before adding the Public IP, hub VNet, and route tables required to actually force traffic through it
- That's hub-and-spoke, enterprise-landing-zone-grade infrastructure for a single VM running a personal photo library
- The actual goal — preventing direct, unrestricted access to the VM — is fully achievable with NSG rules scoped to Cloudflare's published IP ranges plus a single admin IP for SSH, at zero additional cost
This mirrors the same class of decision behind a real Azure cost optimization initiative: matching the control to the actual risk and scale of the workload, rather than reaching for the most capable (and most expensive) tool by default.
Why a Managed Disk instead of Blob Storage?
Immich's storage layer expects a standard POSIX filesystem for its library and Postgres data directory. Azure Blob Storage would need blobfuse2 to present as a filesystem, which adds latency, complexity, and known reliability caveats for database workloads — Postgres in particular does not tolerate blob-backed storage well. A Managed Disk was the simpler, more reliable choice.
Known limitation: this ties storage lifecycle to the VM and doesn't scale independently. A future iteration could split the Postgres data (kept on Managed Disk) from the media library (migrated to Blob with an Immich storage plugin or NFS-gateway pattern) if the library outgrows single-disk economics.
Why Standard_B2s, and the trade-off that comes with it
Immich's workload is bursty — occasional photo/video uploads and periodic ML jobs (face detection, smart search indexing), not sustained CPU load. B-series burstable VMs accumulate CPU credits during idle periods and spend them during these bursts, which fits this access pattern far better than a constant-throughput VM size, at a fraction of the cost (~$30–40 CAD/month vs. several times that for a comparable Dv5/Ev5 size).
Immich's documentation lists 6 GB RAM / 2 vCPU as the minimum spec and 8 GB RAM / 4 vCPU as recommended for a smooth experience with a large library or multiple users. B2s (2 vCPU / 4 GiB RAM) sits below that minimum. In practice this means ML jobs (face detection, smart search indexing) run slower than on a fully-specced box, and a very large batch upload could put memory pressure on the VM. I accepted this trade-off for a single-user personal library at minimum cost; for a heavier workload, Standard_B2ms (2 vCPU / 8 GiB, still burstable) is the better fit at a modest cost increase (~$55–65 CAD/month).
Why 128 GiB OS disk + 500 GiB data disk
I split the OS disk (128 GiB) from the data disk (500 GiB) rather than running everything on one volume:
- The OS disk holds Ubuntu, Docker Engine, Nginx, and app configuration — 128 GiB is comfortably more than this needs, leaving headroom for logs and Docker image layers
- The 500 GiB data disk is sized for the actual photo/video library and Postgres data, which is the part that grows over time — keeping it on its own disk means it can be resized, snapshotted, or migrated independently of the OS disk
- Separating the two also means an OS-level issue (a bad update, a corrupted boot volume) doesn't put the media library at risk, and vice versa
What Immich Does
Immich is a self-hosted, open-source alternative to Google Photos or iCloud Photos. It provides:
- Automatic backup from mobile devices — a companion app on iOS/Android uploads photos and videos to the server in the background, similar to Google Photos' auto-backup
- A web interface for browsing, organizing, and sharing the library from any browser
- Machine learning features run entirely on your own infrastructure: facial recognition and person grouping, smart/semantic search (e.g. searching "beach" or "dog" finds matching photos without manual tagging), and object/scene detection
- Albums, sharing, and multi-user support — useful for a household or family sharing one library while keeping control of the data
- Full data ownership — nothing is uploaded to a third-party cloud provider's photo service; the only infrastructure involved is what I control (in this case, the Azure VM)
The trade-off versus a commercial photo service is that I'm responsible for the availability, backup, and security of the data myself — which is exactly the gap this project addresses.
Proof of Deployment
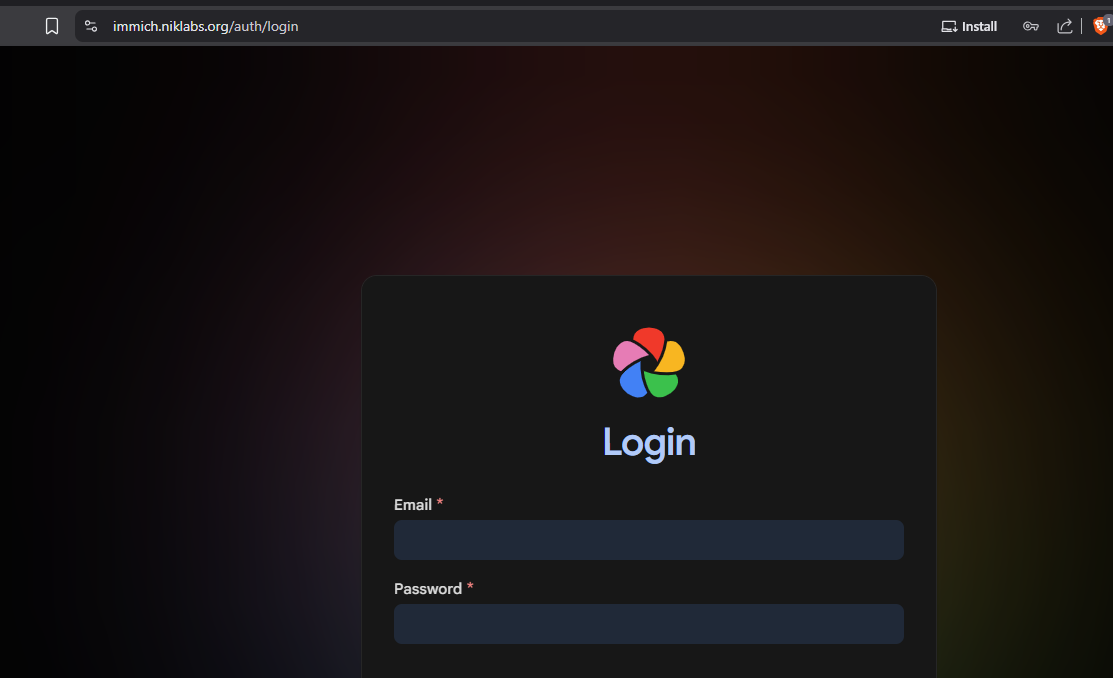
immich.niklabs.org resolving with a valid TLS certificate (the browser's padlock icon confirms the Cloudflare Origin CA cert is trusted end-to-end) and serving the Immich login page — confirming the full chain (Cloudflare DNS/proxy → NSG → Nginx → Immich container) is working as designed.
1. Provisioned the Resource Group, VNet, and Subnet
az group create --name rg-immich-prod --location canadacentral

az network vnet create \
  --resource-group rg-immich-prod \
  --name vnet-immich-prod \
  --address-prefix 10.20.0.0/16 \
  --subnet-name snet-immich-app \
  --subnet-prefix 10.20.1.0/24
2. Created the NSG and Rules
az network nsg create --resource-group rg-immich-prod --name nsg-immich-prod
# (applied the rule set from the NSG section above)

az network vnet subnet update \
  --resource-group rg-immich-prod \
  --vnet-name vnet-immich-prod \
  --name snet-immich-app \
  --network-security-group nsg-immich-prod
3. Created the Public IP and VM
az network public-ip create \
  --resource-group rg-immich-prod \
  --name pip-immich-prod01 \
  --sku Standard \
  --allocation-method Static

az vm create \
  --resource-group rg-immich-prod \
  --name vm-immich-prod01 \
  --image Ubuntu2404 \
  --size Standard_B2s \
  --os-disk-size-gb 128 \
  --vnet-name vnet-immich-prod \
  --subnet snet-immich-app \
  --public-ip-address pip-immich-prod01 \
  --admin-username nikhil \
  --generate-ssh-keys \
  --nsg ""  # NSG already applied at subnet level, avoid duplicate NIC-level NSG
4. Created and Attached the Data Disk
az disk create \
  --resource-group rg-immich-prod \
  --name disk-immich-data \
  --size-gb 500 \
  --sku StandardSSD_LRS

az vm disk attach \
  --resource-group rg-immich-prod \
  --vm-name vm-immich-prod01 \
  --name disk-immich-data
On the VM:
sudo lsblk                       # identified the new disk, e.g. /dev/sdc
sudo mkfs.ext4 /dev/sdc
sudo mkdir -p /mnt/immich
sudo mount /dev/sdc /mnt/immich
echo '/dev/sdc /mnt/immich ext4 defaults,nofail 0 2' | sudo tee -a /etc/fstab
5. Hardened the OS
sudo apt update && sudo apt upgrade -y
sudo ufw default deny incoming
sudo ufw default allow outgoing
sudo ufw allow from 203.0.113.45 to any port 22 proto tcp
sudo ufw allow 443/tcp
sudo ufw enable

# SSH key-only auth
sudo sed -i 's/^#\?PasswordAuthentication.*/PasswordAuthentication no/' /etc/ssh/sshd_config
sudo systemctl restart ssh
6. Installed Docker and Docker Compose
curl -fsSL https://get.docker.com | sudo sh
sudo usermod -aG docker $USER
sudo systemctl enable --now docker
7. Deployed Immich
mkdir -p ~/immich-app && cd ~/immich-app
mkdir -p /mnt/immich/{library,postgres}
wget -O docker-compose.yml https://github.com/immich-app/immich/releases/latest/download/docker-compose.yml
wget -O .env https://github.com/immich-app/immich/releases/latest/download/example.env
Edited .env to point storage locations at /mnt/immich:
UPLOAD_LOCATION=/mnt/immich/library
DB_DATA_LOCATION=/mnt/immich/postgres
IMMICH_VERSION=release
DB_PASSWORD=<generated a strong password>
8. Installed Nginx and Configured TLS with a Cloudflare Origin CA Certificate
Rather than Let's Encrypt/Certbot, I used a Cloudflare Origin CA certificate for TLS on the origin server. Since Cloudflare proxies all traffic to the VM (orange cloud), the origin only ever needs to present a certificate that Cloudflare itself trusts — it doesn't need to be a publicly trusted CA cert, and Cloudflare's Origin CA certs are valid for up to 15 years, which avoids the renewal automation Let's Encrypt requires. This also means port 80 doesn't need to stay open on the NSG or UFW at all, since there's no HTTP-01 challenge to serve.
Generated the wildcard Origin CA certificate from the Cloudflare dashboard (SSL/TLS → Origin Server → Create Certificate), covering *.niklabs.org and niklabs.org, with a 15-year validity and RSA 2048-bit key. Cloudflare returns the certificate and private key once at creation time — I saved both to the VM:
sudo mkdir -p /etc/ssl/cloudflare
sudo nano /etc/ssl/cloudflare/niklabs-origin.pem   # pasted the Origin Certificate
sudo nano /etc/ssl/cloudflare/niklabs-origin.key   # pasted the Private Key
sudo chmod 600 /etc/ssl/cloudflare/niklabs-origin.key
/etc/nginx/sites-available/immich:
server {
    listen 443 ssl;
    server_name immich.niklabs.org;

    ssl_certificate     /etc/ssl/cloudflare/niklabs-origin.pem;
    ssl_certificate_key /etc/ssl/cloudflare/niklabs-origin.key;

    location / {
        proxy_pass http://127.0.0.1:2283;
        proxy_set_header Host $host;
        proxy_set_header X-Real-IP $remote_addr;
        proxy_set_header X-Forwarded-For $proxy_add_x_forwarded_for;
        proxy_set_header X-Forwarded-Proto $scheme;

        # Immich uploads can be large — raise client body size
        client_max_body_size 50000M;
        proxy_read_timeout 600s;
    }
}
sudo ln -s /etc/nginx/sites-available/immich /etc/nginx/sites-enabled/
sudo nginx -t && sudo systemctl reload nginx
9. Configured Cloudflare DNS
- Added an
Arecord:immich.niklabs.org→20.116.42.187 - Set proxy status to Proxied (orange cloud)
- Under SSL/TLS, set encryption mode to Full (strict) — this requires a valid, Cloudflare-trusted certificate on the origin, which the Origin CA cert from step 8 provides, and ensures the Cloudflare-to-origin leg is also encrypted, not just client-to-Cloudflare
10. Configured Azure Backup
az backup protection enable-for-vm takes a VM-consistent backup of the entire VM (OS disk + attached data disks), which is what I wanted here — it captures the OS, Docker configuration, and the disk-immich-data mount together, so a restore brings back a fully consistent, bootable environment rather than just a data disk that would need to be reattached and reconfigured by hand.
az backup vault create \
  --resource-group rg-immich-prod \
  --name rsv-immich-prod \
  --location canadacentral
Policy JSON (daily backup at 23:00 UTC, 30-day retention):
cat > backup-policy.json << 'EOF'
{
  "properties": {
    "backupManagementType": "AzureIaasVM",
    "schedulePolicy": {
      "schedulePolicyType": "SimpleSchedulePolicy",
      "scheduleRunFrequency": "Daily",
      "scheduleRunTimes": ["2026-01-01T23:00:00Z"]
    },
    "retentionPolicy": {
      "retentionPolicyType": "LongTermRetentionPolicy",
      "dailySchedule": {
        "retentionTimes": ["2026-01-01T23:00:00Z"],
        "retentionDuration": {
          "count": 30,
          "durationType": "Days"
        }
      }
    }
  }
}
EOF

az backup policy create \
  --resource-group rg-immich-prod \
  --vault-name rsv-immich-prod \
  --name daily-immich-vm-policy \
  --backup-management-type AzureIaasVM \
  --policy @backup-policy.json

az backup protection enable-for-vm \
  --resource-group rg-immich-prod \
  --vault-name rsv-immich-prod \
  --vm vm-immich-prod01 \
  --policy-name daily-immich-vm-policy
Note: the scheduleRunTimes date component is ignored by Azure Backup for recurring schedules — only the time-of-day (23:00:00Z) matters. Confirmed the job registered correctly:
az backup job list \
  --resource-group rg-immich-prod \
  --vault-name rsv-immich-prod \
  --output table
11. Migrated the Existing Library
Immich supports bulk upload via its CLI. I used it to migrate the surviving photo library from the failed local instance:
npm install -g @immich/cli
immich login https://immich.niklabs.org <api-key>
immich upload --recursive /path/to/recovered/photos
Outcome
- Immich is publicly reachable at
https://immich.niklabs.orgwith valid TLS, and the origin VM's IP is not directly discoverable - Total monthly infrastructure cost is dominated by the VM (~$30–40 CAD), the 128 GiB OS disk (~$15–20 CAD), and the 500 GiB data disk (~$55–65 CAD) — no Application Gateway or Firewall spend
- Daily VM-consistent backups via Azure Backup (covering the OS disk and the attached data disk together) close the resilience gap that caused the original migration
- Network access is scoped to least-privilege: HTTPS/HTTP from Cloudflare only, SSH from a single known IP, everything else denied at both the NSG and host firewall layers
Future Improvements
- Automate Cloudflare IP range refresh for the NSG rules (scheduled Azure CLI/Function job)
- Evaluate splitting media storage to Blob Storage once library size makes disk economics less favorable
- Add Infrastructure-as-Code (Terraform, matching the existing azure-terraform-vm-deployment project) to make this environment fully reproducible
- Add Azure Monitor / Log Analytics for VM and Nginx access log monitoring